Wednesday, October 31, 2012

Monster Eyes


Happy Halloween!!

To get everyone in the spirit- here is a picture of our cute carved pumpkin! :) As you can see Teddy was just overjoyed for the photo shoot ;)

I hope you’re all enjoying a spooktacular day filled with ghosts, goblins and goodies!! Here is a fun treat I brought into work to frighten my friends! Good thing they’re yummy so they came back for more!

MONSTER EYEBALLS 
(this recipe makes about 24)


What you need for the eyeballs:
3/4 cup creamy peanut butter
1/2 stick of butter (softened)
1-2 cups of powdered sugar
1 teaspoon vanilla extract
1/2 package of semi-sweet chocolate chips or 6oz almond bark
1 tablespoon shortening
About 24 M&Ms

To makethe eyeballs:
1. Place your softened butter in a microwavable dish with the peanut butter and microwave for about 15 seconds. You want everything to be softened enough to blend easily.
2. Mix in the vanilla extract and 1 cup of powdered sugar; add more sugar if you think the mixture should be firmer. If the mixture is too soft at this point, pop it in the fridge for 10 minutes.
3. Line a cookie sheet with wax paper and roll the peanut butter mixture into small balls (I tried to shape mine a bit more like an eye with pointed ends)
4. Refrigerate for a half hour or pop in the freezer for at least 10 minutes.
While you wait, you can clean up and then start melting your chocolate.
5. Put the chocolate chips or chopped almond bark in a microwavable dish with the tablespoon of shortening (I really think this helps thin out the chocolate). 6. Microwave in 30 second increments; take it out and stir. Do this a few times until your chocolate is melted and smooth.
7. Now pull your eyeballs from the fridge (haha that sounds funny!) and using a toothpick, dip each one into the chocolate. It took me a few times to get this exactly the way I wanted it but if you roll it back and forth from front to back the shape of an eye will form.
8. Place an M&M in the middle of the of the ‘eye’ to make an iris.


ENJOY!!!

Tuesday, October 30, 2012

Scarecrow Bites

Happy 'almost' Halloween Everyone!! I'm in the fall spirit this evening with the howling wind, swirling leaves and lit carved pumpkins!! Luckily, Sandy has only hit us with some minor rain and major wind...we have not experienced any of the extreme situations our fellow East-coasters have and I am very grateful to be in a warm, lit, internet-able home tonight! Prayers and positive thoughts go out to those affected by Sandy.

For those of you also in the fall spirit and wanting a fun Halloween treat, here is a ghoulish goody to share with your friends and family.

SCARECROW BITES

What you need for the bottom layer:
1 stick of butter (softened)
1 (18.25-ounce) package pudding in the mix yellow cake mix
1 egg
3 cups miniature marshmallows

To make the bottom layer:
1. Heat oven to 350°F. 
2. Combine butter and cake mix in large bowl. Beat on low speed until well mixed. 
3. Add egg; continue beating until well mixed.
4. Press onto bottom of ungreased 15x10x1-inch jelly-roll pan.(You'll notice in my photos that my jelly-roll pan was too large- I just pushed out the dough until it was the right consistency and squared it off. Once they were cut- I'm guessing no one will tell a difference.) 

5. Bake for 12 to 15 minutes or until set and edges are lightly browned. Remove from oven.
6. Immediately sprinkle marshmallows over hot, partially baked crust. Return to oven; continue baking for 1 to 2 minutes or until marshmallows puff.


What you need for the topping:
1/2 cup light corn syrup
1/4 cup sugar
1/4 cup firmly packed brown sugar
1/2 cup creamy peanut butter
2 teaspoons vanilla
2 cups crisp rice cereal
2 cups salted peanuts (chopped)
1 cup candy corn

To finish the bites:
7. While your crust is baking, combine corn syrup, sugar and brown sugar in large saucepan. 
(All the while jumping over the kitty chasing a paper bag around the floor!)
8. Cook over medium heat, stirring until mixture comes to a boil (2 to 4 minutes). Stir in peanut butter and vanilla and mix until smooth.
9. Remove from heat; stir in cereal, peanuts and candy corn (I transferred mine into a bigger bowl). Let this sit for a few minutes while your marshmallow part is toasting.

10. Once the mixture is cool enough to touch (I waited about 5 minutes or so- and it is still hot so be careful) spoon over the marshmallow crust. I then used my hands to spread it evenly over the top of the crust. I had a difficult time with just a spoon as I got large hunks of topping in one spot...using your fingers is a little easier. 


ENJOY!!

Wednesday, October 24, 2012

More filling fun!

Good Afternoon!!

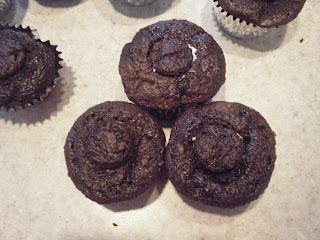
How are all of you? Hope you’re having a great week! I can’t believe how dreary and rainy it’s been. It is not helping me look forward to winter that’s for sure!! With all the gloominess, it’s a perfect time to light the oven and make a fun treat. These particular cupcakes were for a work get together one of my co-workers hosted last night. The cakes are a bit different than I had anticipated but I’m still pleased with the turnout. I was expecting a dense, heavy cake but it was quite light and fluffy which made for a good contrast with the thick and creamy frosting.  I wanted to try my hand at the filling technique again so here’s a chocolate twist to the recipe! I’m throwing in my fluff-cream frosting recipe again as a refresher!


What you need for the cake:
1 (18 1/4 ounce) package chocolate cake mix (I used Betty Crocker triple fudge)
1 (4 ounce) box instant chocolate pudding mix (I used Devil’s Food)
1 cup sour cream
1/2 cup water
1/2 cup vegetable oil
4 large eggs

What you need for the frosting:
1 pound box of powdered sugar
1 stick of butter (softened)
1 12oz container of marshmallow fluff
1 8oz container of cream cheese (softened)

To make the cake:
1. Preheat oven to 350°F.
2. Line your cupcake tins with liners or grease with Crisco.
3. Place the cake mix, pudding mix, sour cream, water, oil, and eggs in a large mixing bowl.
4. Blend with an electric mixer on low speed for 1 minute. Stop and scrape down the sides of the bowl.
5. On medium-low speed, continue to blend for 2-3 minutes more.
6. The batter will be very thick and should look well combined which. This is a great batter for cupcakes because it’s so easy to fill your tins; the batter doesn’t run all over the place! 


7. Fill your liners 2/3 of the way full.


8. Bake for 23-28 minutes until a toothpick inserted comes out clean. 
9. Allow to cool in the pans on a wire rack before coring. 


Now is the time to start preparing your frosting!

To make the frosting:
1. Blend cream cheese and butter together in a medium bowl.
2. Add all the marshmallow fluff; then powdered sugar in one cup increments until it is of the right consistency for icing your cakes. 

Now you’ll want to go back to your cupcakes and start the coring process. Once again, I’m using my cool tool! :) After my last experience, I realized I didn’t take quite enough out of the cupcake so you’ll notice these cores are a bit bigger.  


After your cores are out, utilize your injector or a piping bag to fill the cupcakes. 


Place your cores back on top (remember to chop about half of the core off so that they fit best). Finally, frost the tops of your cupcakes so they look pretty!


ENJOY!!

Wednesday, October 17, 2012

Pies in the oven!

Happy mid-October everyone!! Fall is most definitely in the air- crisp temperatures, beautiful changing leaves and pies in the oven! I came home to visit while my mom took some vacation this week and we had made a promise that we’d back pies while I was here. I know you may find this hard to believe but the last two times I’ve attempted pie crust from scratch it has ended miserably, in tears. For some reason I could just not get it right! Using the Pillsbury ready-made fridge kind is easy and convenient but there is something to be said about making a homemade crust to serve to friends and family. So, I needed mom’s trusted advice and help!! At first we were going to each make an apple pie- one for her to keep, and one for me to bring home. After some thought though, it dawned on us that we most definitely needed to make our first pumpkin pie of the season! So, after doing some fun shopping and going out to lunch, we came back to begin pie production!

On the menu for today: FRENCH APPLE PIE and PUMPKIN PIE with HOMEMADE CRUST 

HOMEMADE CRUST (for two 9-inch pies)

What you need for the crust:
2 cups all-purpose flour
1 cup cold shortening
1 teaspoon salt
1/4 cup ice cold water

To make the crust:
In the bowl of a food processor, combine flour and salt. Cut in shortening in small pieces by pulsing food processor until mixture resembles coarse crumbs. Pour in ice cold water and pulse two or three more times until mixture begins to form a ball.
Divide dough in half (you can now refrigerate the dough for a few hours or overnight if you want to wait to make your pie).
One half of the dough recipe.
Otherwise, roll out dough on a floured counter into two 10 inch rounds- being careful not to overwork it.
For easy transfer, you can re-roll the crust back onto the rolling pin and place it on top of the pie plate.
Once pressed into the pie plate, be sure to prick the bottom of the crust with a fork giving it room to breathe.
One pie crust rolled out and pressed- not bad!!
FRENCH APPLE PIE
What you need for the pie filling:
1 homemade pie crust (recipe above), pricked with fork and topped with a little extra flour
8 cups granny smith apples (about 8 medium sized)
3/4 cup brown sugar
1/4 cup all-purpose flour
3/4 tsp ground cinnamon
1/4 tsp ground nutmeg
A dash of salt
1/2 tsp lemon juice

What you need for the pie topping:
3/4 cup all-purpose flour
1/2 cup packed brown sugar
1/2 cup chopped pecans
1/4 cup quick cooking oats
1/2 cup cold butter (cut into small pieces)

Action shot!


To make the pie filling:
1. Pre-heat oven to 400° F.
2. Peel and thinly slice apples. (You can soak apples in about 6 cups of water with about 1 tablespoon of lemon juice to keep them from browning while you slice.)
3. In a large bowl mix sugar, flour, cinnamon, nutmeg, and salt. Stir in sliced, drained apples. 
Our apple mixture!
4. Spoon mixture into your prepared pie pan.
Now, make your pie topping:
5. In a small bowl, mix flour, sugar, pecans and oats.
6. Use a pastry blender or fork to cut in butter until the mixture is crumbly.
Our crumb topping! Yum!
7. Spoon pie topping evenly over filled pie crust. Bake for 35-40 minutes in oven; cover with foil if you feel it is becoming too brown.
Mom with our pie before baking!

PUMPKIN PIE
What you need for the pie:
1 homemade pie crust (recipe above) pricked with a fork
1 (15 oz.) can pumpkin (about 2 cups)
1 (14 oz.) can sweetened condensed milk  (we used Eagle brand)
2 large eggs 1 teaspoon ground cinnamon
1/2 teaspoon ground ginger
1/2 teaspoon ground nutmeg
1/2 teaspoon salt

To make the pie:
1. Pre-heat oven to 425°F.
2. Prepare your other 9-inch pie plate with crust recipe from above; prick bottom of crust with a fork.
3. Whisk pumpkin, sweetened condensed milk, eggs, spices and salt in medium bowl until smooth. Pour into crust.
Before baking! (mom cut off my head- thanks, mom!)
4. Bake for 15 minutes; then, reduce oven temperature to 350°F and bake for an additional 35 to 40 minutes or until toothpick inserted in center of pie comes out clean. 
5. Cool and garnish as desired. Our original crumb topping recipe made a ton (I cut the recipe above down to a more appropriate amount for the apple pie) so we used the extra to top half of our pumpkin pie! I have to say- pumpkin pie is awesome with crumb topping!

Finished products!

ENJOY!