 Hello!! I am so excited to share this new creation with you that I still have some of the cream cheese frosting on my fingers! I told Danny yesterday and today that I really wanted to get a cupcake corer so that I could try making filled cupcakes. On the way home from church this morning he surprised me by stopping at this little Kitchen Art store near our house. It's a super fun place with tons of gizmos and gadgets to fit any cooking or baking need. Not only did a find a cupcake corer but also a cupcake injector! Who knew that even existed?! Needless to say I couldn't even get my coat off before wanting to get my cupcakes in the oven to give my new tools a try! To make this a little simpler, I used a store bought cake mix that I got at Sam's Club last week. This particular box included 3 pouches of baking mix, making your cupcake mixing super easy!
PUMPKIN CREAM CHEESE CUPCAKES
What you need for the cake:1 pouch of Krusteaz Pumpkin Spice Baking mix (however you could use anything- I know Pillsbury and Libby's makes mixes too!)
2 eggs (per box instructions)
1/3 cup vegetable oil (per box instructions)
1/2 cup water (per box instructions)
To make the cake:
1. Preheat oven to 350 degrees.
2. Prepare muffin pan by greasing or lining each cup.
3. Pour baking mix into a large mixing bowl, add water, eggs and oil. Mix with a whisk or wooden spoon until well blended.
4. Fill lined or greased muffin cups with mix until about 2/3 full.
5. Bake in your preheated oven for 18-22 minutes, until toothpick comes out clean.
While the cupcakes are baking, you can make your cream cheese filling. Feel free to use any sort of frosting you like; however I think my Fluffcream Frosting or this basic recipe works just great!
What you need for the frosting:
8oz package of cream cheese (softened)
1 stick of butter (softened)
1 tsp vanilla extract
1-2 cups powdered sugar
To make the frosting:
1. Cream together your butter and cream cheese with an electric mixer.
2. Add the vanilla extract.
3. Add 1 cup of powdered sugar and blend until incorporated; add one half cup at a time until you have reached desired consistency (mine took just about 2 cups).
4. Pop this frosting in the fridge while you core your cupcakes (this makes it easier to fill and frost).
Now for the fun part!! Here are some step by step instructions on how to core, fill and then frost your cupcakes.
 |
| This is an image of the cupcake corer I bought by NORPRO |
 |
| These are some of the cupcakes and corer before starting. |
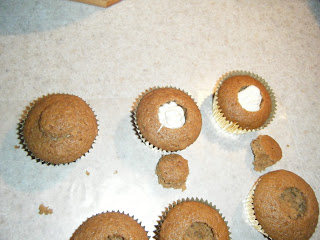
Be sure your cupcakes have cooled for at least 30-60 minutes. (You'll smoosh them if they're too warm.) To core the cupcakes, I used the smallest sized corer that the kit came with. While twisting, push down into your cupcake about a 3/4-1 inch. (The first couple times I didn't quite get enough of a core so you may need to practice on one or two.) Once the core comes out, it will stay inside the plastic and you just push down the button on top of the corer to remove it. Do this to all of your cupcakes.
Next, slice about 1/4 inch off of each of these cores so it's easier to push back into the cupcake once you've filled them. You can eat the extras as a snack while you fill and frost! ;)
 |
| Here is a picture of the injector I'm using and the cream cheese frosting. |
Remove the back part of the injector and fill the tube with frosting. Fill it up as much as you can (without overflowing out the back) so you can fill as many cupcakes at once as possible. I only had to re-fill it once during this process. I used the small tip that came with the injector for filling, this way I could fill up the cupcakes as much as I wanted. The kit came with several different size tips; you could use whichever you like most. Just remember that no one will really see what the filling looks like, only the frosting on top. Using a small tip made it easy to not overfill the cupcakes.
 |
| The one on the top left had the top back in it. |
And in case you were interested, this was Teddy during the entire process:
ENJOY!!


They look wonderful!! I wish you could transfer one here, and Teddy looks sooo comfy, your mommy
ReplyDelete