Showing posts with label No-Bake. Show all posts

Sunday, January 4, 2015

Peanut Butter 'Bon Bons'

Happy Winter Everyone! I know I haven't blogged in forever but I'm ready to get back on track. I have a late Christmas post for you here...these are honestly a huge hit with everyone- they're light and airy but sweet and crispy, too. Plus, since they're 'no bake' they are super easy to put together. The ingredients may sound funny but trust me, they're SO good! I used white chocolate and red and green sprinkles to make them festive but you could definitely use milk chocolate for the coating. You can honestly whip these up in a matter of minutes so it's easy to bring to your next get together.

What you need for the Bon Bons:
1 and 1/2 cups Rice Krispies
1 and 1/4 cup peanut butter (I always use creamy)
1 cup graham cracker crumbs (I use the Keebler brand)
1/2 cup powdered sugar
3/4 package almond bark (white or milk chocolate) +2 tablespoons Crisco
Sprinkles (as desired)
To make the Bon Bons:
1. Mix the first four ingredients together in a bowl. It's going to seem impossible at first but just keep stirring, it will all come together. At the end, I use my hands to get all the ingredients fully incorporated.
2. Once the mixture has fully pulled together, roll out 1 inch balls and place on a cookie sheet lined with wax paper. I usually get about 30-40 balls out of this.
3. Set the cookie sheet in the fridge or outside to harden up while you melt your chocolate.
4. Cut your almond bark into small pieces. I use the microwave to melt mine. I place the chocolate pieces in a large microwavable bowl with 2 tablespoons of Crisco and microwave on a low setting,  stirring every 30 seconds. 
5. Once chocolate is fully melted, bring your bon bons back out and dip them, using a spoon, until they're fully covered in chocolate. Then lay them back on the wax paper. If you're going to use sprinkles, I use them after I've dipped 4-5...the chocolate still needs to be a little wet in order for the sprinkles to adhere so if you wait too long they won't stick.
6. After all the bon bons have been dipped, put them back in the fridge to fully harden.
ENJOY!!

Saturday, September 28, 2013

Oreo Truffles

Hi Everyone! I can't believe I never posted these- I made them a long time ago! Our house has been on the market now for 2 and a half months...I decided at the beginning that for all of our showings, I would make a treat for people to take and eat as they walked through the house. I had hoped this would persuade them that they just LOVED the house and had to have it. Unfortunately, that hasn't happened yet. Regardless, for the first set of showings I made blueberry muffins...I thought this would be a healthy and standard snack that everyone would eat up. I was wrong! After 3 showings only one muffin was gone. I was so bummed! I had made these truffles for fun the same week just to have something sweet around the house. So, the next showing I put these out to see if they did better than the muffins...8 were missing when we returned! I couldn't believe it! Needless to say, I've steered away from the healthy snacks and am relying on chocolate to get me through. One of these days it's gotta work, right? Anyway, try this SUPER easy, no-bake treat tonight!

OREO TRUFFLES

What you need for the truffles:
1 package Oreo cookies
1 package 8oz cream cheese (softened- you might even use the microwave to get this extra soft)
1 package of chocolate almond bark
1 tablespoon shortening
To make the truffles:
1. Blend the Oreo cookies in a food processor until fine crumbs form. 


2. Add the softened cream cheese to the Oreo crumbs and pulse until combined. Old fashioned hand mixing works well for this, too.
3. Form into 1 inch balls and place on a wax-paper lined cookie sheet. Place in the fridge about 30 minutes until firm.
4. Before pulling the balls out of the fridge, melt your almond bark in a microwave safe dish with the 1 tablespoon of shortening. 
5. Dip the balls in the chocolate and place back on the wax paper. Refrigerate until outside chocolate is set and crunchy. See, I told you this was easy peasy!!


ENJOY!!

Saturday, April 6, 2013

Crunch Chocolate Peanut Butter Cups

Time for another yummy no-bake recipe! 
 
CRUNCHY CHOCOLATE PEANUT BUTTER CUPS

What you need for the PB Cups:
1/2 cup butter
1 1/2 cup peanut butter
3/4 cup graham cracker crumbs
3/4 cup Rice Krispie
1/2 cup powdered sugar
1 1/2 cup milk chocolate bark (this is 6 large squares or half of a package) chopped into pieces

1 Tablespoon shortening


To make the PB Cups:
1. Line a mini muffin tin with papers (you could also use a regular size tin if you want bigger portions).
2. In a microwave safe bowl, melt your butter & peanut butter together at 30 second intervals and stir until smooth.  (This took a total of about a minute for me)


3. Add the graham cracker crumbs, Rice Krispies and powdered sugar and mix until combined.

4. Distribute the mixture evenly in the prepared muffin cups. Pop in the fridge for at least 15 minutes to set up the PB layer.(I had to do this in batches because I only have two mini muffin tins.)
5. After the peanut butter has chilled, combine the chocolate and shortening in a microwave safe bowl and heat in 30 second intervals until it is smooth. I then transferred mine over to a pourable Pyrex measuring cup and poured chocolate on top of each cup.  

6. Finally, pop them back in the fridge until firm, at least 30 minutes. 
Keep them stored in a covered container in the fridge for up to two weeks.  
This made about 52 mini cups; it would probably make about 20 large cups.


ENJOY! 

Saturday, March 23, 2013

Chocolate Cracker Crunch

Sorry for the long hiatus everyone! Work, travel and family have been super busy!! Plus, I was utilizing a lot of the recipes that I've already posted about so I didn't want to be redundant. Don't worry, I'm back in full swing and have two recipes to share with you this weekend! This one is a sweet, simple, no-bake treat that you can whip up in about a half hour! The ingredients may seem odd but believe me, one bite and you'll be hooked!! I didn't alter much of the recipe other than that I added more than what was originally suggested for the topping and I offered another option below. Have fun!!

CHOCOLATE CRACKER CRUNCH BARS

What you need for the crunch bars:
80 Club crackers
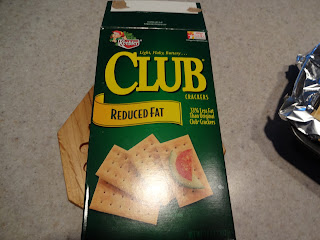
Even with a stick of butter...why not save a few extra calories?
1 cup of butter (two sticks)
2 cups of graham cracker crumbs
1 cup packed light brown sugar
1/2 cup milk
1/3 cup white sugar
For later- 
2/3 cup creamy peanut butter
1/2 cup semi-sweet chocolate chips (I made this a heaping half cup and would suggest closer to 3/4 cup)
1/2 cup butterscotch chips (same as above with these chips!)
Option- instead of adding extra chips, try mixing in a 1/2 cup of prepared caramel icecream topping...I'm definitely doing this next time!!

To make the crunch bars:
1. Line a 9X13-inch baking pan with foil (do not grease), leaving an overhang of foil on either end. 
2. Line the foil with 1 layer of club crackers; they should fit pretty perfectly as mine did but if not, just break them to fit.
3. In a large saucepan, melt butter over medium heat. Add graham cracker crumbs, brown sugar, milk and white sugar. Bring to a boil and then boil for 5 minutes, stirring often. Your mixture will be thick.
4. Remove from heat and spread half of the butter/graham mixture evenly over your prepared crackers.
5. Place another single layer of crackers evenly over the butter/graham mixture. 
6. Spread the rest of your mixture evenly over crackers. Top evenly with remaining crackers.
7. Now, in a small saucepan, combine peanut butter, chocolate chips, and butterscotch chips. (If you use my caramel option, put that in here now, too!) 
8. Melt over medium-low heat, stirring constantly. 
9. Spread evenly over the top of your crackers. Now, pop the pan in the fridge for about an hour. Once cool, lift foil overhang and place bars on a cutting board. 

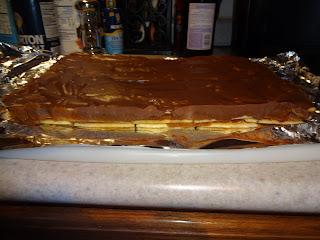
This is after I pulled them out of the pan.
The foil makes this really easy!
10. Cut into bars. Store in the refrigerator.
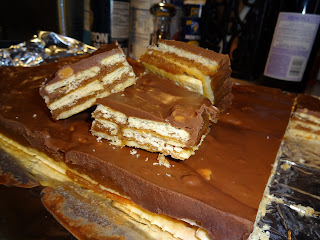
YUM!!
ENJOY!!
My boys hanging out with NASCAR while I was in the kitchen! <3


Sunday, January 13, 2013

Chocolate PB Crunch Balls

OMG...these things are out of this world. I don't know how I haven't come across this recipe sooner. They're like a light and fluffy version of a buckeye- so much so that you CAN'T. STOP. EATING. THEM. Danny hasn't felt good this weekend- he didn't want to try one. I forced him. He went back for seconds and thirds...then I put the pan back in the fridge and he asked where they went!

Enough talk- let's get down to business so you can make these little bad boys ASAP!

What you need for the balls:
*Quick note- I halved this recipe because we did NOT need 70 of these sitting around!
2 cups creamy peanut butter
3 cups rice krispies
1lb (3cup) powdered sugar
 

1/4 cup melted butter
2 packages semi-sweet chocolate chips (1T shortening)

To make the balls:
1. In a microwave safe dish, measure out your peanut butter and butter. 
2. Microwave on low for about 30 seconds (until butter is melted) and it's easier to mix.
3. Mix in powdered sugar, 1 cup at a time. Scrape sides of bowl as needed.
The mixture is thick once all powdered sugar is in there.
4. Once all sugar is fully mixed in, pour in your rice krispies. At this point, the mixture is pretty thick. The original blogger noted that it was easier to mix in the krispies with your hands so I took her advice! You can use a spoon, it just might take a little longer.

Everything is mixed in.
5. Pop the bowl in the fridge for about 10-15 minutes to cool it down.
6. In the meantime, pour your chocolate chips in a microwavable container. I always add a tablespoon of shortening because I think it melts better this way.
7. Once your peanut butter mixture is chilled enough, take it out of the fridge and roll 1-inch balls. Place on a wax-paper lined cookie sheet.
8. Dip your balls one at a time in the melted chocolate. Place back on the wax paper and pop in the fridge until hardened (this was the hardest part- waiting!!)

Don't you just want to pop one in your mouth right now?
ENJOY! 
This recipe is modified from the original found here.

Thursday, December 20, 2012

Holiday Truffles

Hi Everyone!! Time for some of the holiday baking posts to begin! I'm so excited to be sharing these Christmas recipes with you. First, here is a fun Christmas picture of the cutest kitten ever!

And yes, there are Happy Birthday presents as well- lots of friends with December birthdays!
Some of them are tried and true while others are brand new! What are all of your plans for the upcoming holidays? Do you have a lot of traveling to do? Well I can guarantee that this is one treat that will travel really well! Danny and I each had lots of goodies to deliver today at our workplace and I can tell you from the feedback I received that these truffles were a huge hit! They were probably one of the easiest recipes that we put together and definitely one of the most favorite. Please feel free to experiment with the chocolates and let me know what you think!

DOUBLE CHOCOLATE TRUFFLES


What you need for the truffles:
8 ounces good semisweet chocolate
8 ounces good bittersweet chocolate
1 can (14 Oz) sweetened condensed milk
1 Tablespoon vanilla extract (you could switch this up for fun and go with mint or maybe almond? Have fun!)
1lb meltable white almond bark (and one teaspoon vegetable shortening)
Red and green crystal sugar or Christmas sprinkles

To make the truffles:
1. Set-up a double boiler and start with the can of sweetened condensed milk. 
2. While this is warming, I started my chocolate squares in a microwave safe Pyrex dish- about 1 minute. I felt that giving this a head start really helped with the double boiler technique.
3. Once the chocolates are warm (they won't even really look melted), add them to the already warming sweetened condensed milk. 
4. Stir continuously until everything is combined- mixture will have a slight marshmallow texture. Stir in vanilla extract (or whatever you decide to use).
5. Remove from heat, cover and refrigerate for about two hours.
This was after it had chilled for a couple hours.
6. Right before you're ready to pull the mixture out of the fridge, melt your almond bark in a microwave safe container with the teaspoon of shortening. Mix it up about every 40 seconds. 
7. Roll your chilled chocolate mixture into balls, then dip in melted white chocolate. Sprinkle with the red and green sugar or Christmas sprinkles. 


MERRY CHRISTMAS!! ENJOY!