Sunday, September 30, 2012

Filled Pumpkin Cupcakes


Hello!! I am so excited to share this new creation with you that I still have some of the cream cheese frosting on my fingers! I told Danny yesterday and today that I really wanted to get a cupcake corer so that I could try making filled cupcakes. On the way home from church this morning he surprised me by stopping at this little Kitchen Art store near our house. It's a super fun place with tons of gizmos and gadgets to fit any cooking or baking need. Not only did a find a cupcake corer but also a cupcake injector! Who knew that even existed?! Needless to say I couldn't even get my coat off before wanting to get my cupcakes in the oven to give my new tools a try! To make this a little simpler, I used a store bought cake mix that I got at Sam's Club last week. This particular box included 3 pouches of baking mix, making your cupcake mixing super easy!

PUMPKIN CREAM CHEESE CUPCAKES

What you need for the cake:1 pouch of Krusteaz Pumpkin Spice Baking mix (however you could use anything- I know Pillsbury and Libby's makes mixes too!)
2 eggs (per box instructions)
1/3 cup vegetable oil (per box instructions)
1/2 cup water (per box instructions)

To make the cake:
1. Preheat oven to 350 degrees.
2. Prepare muffin pan by greasing or lining each cup.
3. Pour baking mix into a large mixing bowl, add water, eggs and oil. Mix with a whisk or wooden spoon until well blended. 
4. Fill lined or greased muffin cups with mix until about 2/3 full.
5. Bake in your preheated oven for 18-22 minutes, until toothpick comes out clean.
While the cupcakes are baking, you can make your cream cheese filling. Feel free to use any sort of frosting you like; however I think my Fluffcream Frosting or this basic recipe works just great!

What you need for the frosting:
8oz package of cream cheese (softened)
1 stick of butter (softened)
1 tsp vanilla extract
1-2 cups powdered sugar

To make the frosting:
1. Cream together your butter and cream cheese with an electric mixer.
2. Add the vanilla extract.
3. Add 1 cup of powdered sugar and blend until incorporated; add one half cup at a time until you have reached desired consistency (mine took just about 2 cups). 
4. Pop this frosting in the fridge while you core your cupcakes (this makes it easier to fill and frost). 

Now for the fun part!! Here are some step by step instructions on how to core, fill and then frost your cupcakes. 


This is an image of the cupcake corer I bought by NORPRO


These are some of the cupcakes and corer before starting.

Be sure your cupcakes have cooled for at least 30-60 minutes. (You'll smoosh them if they're too warm.) To core the cupcakes, I used the smallest sized corer that the kit came with. While twisting, push down into your cupcake about a 3/4-1 inch. (The first couple times I didn't quite get enough of a core so you may need to practice on one or two.) Once the core comes out, it will stay inside the plastic and you just push down the button on top of the corer to remove it. Do this to all of your cupcakes. 


Next, slice about 1/4 inch off of each of these cores so it's easier to push back into the cupcake once you've filled them. You can eat the extras as a snack while you fill and frost! ;)


Here is a picture of the injector I'm using and the cream cheese frosting.

Remove the back part of the injector and fill the tube with frosting. Fill it up as much as you can (without overflowing out the back) so you can fill as many cupcakes at once as possible. I only had to re-fill it once during this process. I used the small tip that came with the injector for filling, this way I could fill up the cupcakes as much as I wanted. The kit came with several different size tips; you could use whichever you like most. Just remember that no one will really see what the filling looks like, only the frosting on top. Using a small tip made it easy to not overfill the cupcakes. 
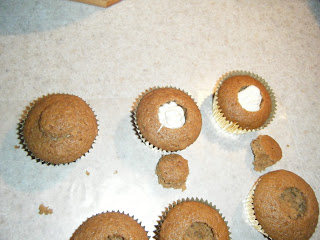

The one on the top left had the top back in it.
Once you've filled all the cupcakes, you can place the tops back on the filling. By cutting off a little extra, they should fit pretty well back into the holes.


Now for the funnest part- you can use the injector to help frost the tops of your cupcakes too! It works amazingly well because you can really control the speed and direction of the injector so much easier than a decorating bag. Choose a fun tip that you like from the kit and starting on the outside edge of the cupcake work your way in a circle towards the middle of the cupcake and wala- you have an awesome looking, filled cupcake!

And in case you were interested, this was Teddy during the entire process:

ENJOY!!

Wednesday, September 26, 2012

Fast Fudge


Hi Everyone! Hope everyone is enjoying our first full week of fall! We celebrated the first day of fall this past weekend with cooler temperatures. It was a great time to light the oven and start baking! We made homemade Giordano’s pizzas on Saturday night that were out of this world. I’ll definitely have to share that recipe sometime soon. There was no Purdue game this weekend so it was kind of low key around our house. It was nice to just do some cooking and cleaning and get caught up on household items. On Sunday I came down with a nasty cold so my hopes of cookie and cake baking didn’t quite come to fruition. Instead, I stuck with an easy fudge recipe I’d been wanting to try. It's a perfect mid-week recipe to try because it doesn't take more than a half hour! I’ve seen about three particular fudge recipes that look easy enough and I want to get in some practice before the holiday season to see which one is best.Try them out and let me know what you think!

CHOCOLATE PRETZEL FUDGE

What you need for the fudge:
Nonstick cooking spray
2 tablespoons unsalted butter, cut into small pieces
3 cups semisweet chocolate chips (16 ounces)
1 can (14 ounces) sweetened condensed milk
1/2 teaspoon pure vanilla extract
1/8 teaspoon fine salt
2 – 2 and a 1/2 cups roughly chopped miniature pretzel (I wanted to add a little saltiness to the recipe so I chopped up 2 cups of pretzels to mix in. You could do an extra half cup that can go on top when you’re finished but I just mixed mine in. You could also easily leave this out or add in pecans, almonds, crushed up cookies, candies, etc. Any sort of topping that you enjoy!)

To make the fudge:
This is seriously the easiest thing to throw together!
1. Coat an 8-inch square baking pan with cooking spray and line with parchment paper, leaving a 2-inch overhang on all sides. (I actually ran out of parchment paper yesterday when making my chicken pot pie so I just Crisco’d the bottom of the pan really good. Once it has sat in the fridge for a while, you can loosen the sides, flip it over, hit the bottom of the pan a few times and it should pop right out!) I would recommend using the parchment if you have it though.
2. Place butter, chocolate chips, condensed milk, vanilla, and salt in a medium heatproof bowl set in a pot of barely boiling water. Stir occasionally until chocolate just melts and mixture is combined and warm but not hot, 8 to 10 minutes. Remove from heat and stir in 2 cups of crushed pretzels (or whatever topping you choose). 
3. Transfer mixture to pan and smooth top. (If you chose to put extra pretzels, nuts, whatever on top, now is the time to press 1/2 cup of them on the top. Like I said before, I just mixed it in and didn’t do this part). 
4. Refrigerate until set, about 1-2 hours . Using parchment, lift fudge from pan and onto a cutting boarding; cut into 36 squares.

ENJOY!

Monday, September 17, 2012

White Chocolate Raspberry Blondies

Hi Everyone! Sorry it’s been so long since I’ve posted! I have been just as busy baking and cooking as normal lately…just didn’t have the spare time to type it all up, I guess! Our little arrival came last Tuesday so we’ve been busy getting adjusted to Teddy and him to us so I’ve been preoccupied!! I made these bars for a barbeque at work last week; since everyone had to bring dessert there were some leftovers that I took to our Purdue tailgate on Saturday and I got great reviews. These require a little extra work with the raspberry sauce but I think it’s worth the effort!
Raspberry White Chocolate Macadamia Nut Blondies
What you need for the Blondies:
2 and 1/2 cups all-purpose flour
3/4 cup + 2 tablespoons unsalted butter, softened
1 and 1/4 cup brown sugar
1 cup sugar
1 and 1/2 teaspoons vanilla
3 eggs
2 and 1/2 teaspoons baking powder
1/4 teaspoon salt
1 cup macadamia nuts, chopped
1 and 1/2 cups white chocolate chips
What you need for the Raspberry Puree:
1 pint raspberries rinsed and set on paper towel to dry
2 tablespoons sugar
1 teaspoon cornstarch
To make the Puree:
Puree after it has cooked down
1. Combine raspberries and sugar in small saucepan. Mash raspberries with a fork, and cook over low heat for approximately 5 minutes or until raspberries have broken down. 
2. Stir in the cornstarch and cook for another 5 minutes or until thickened. Remove from heat, set aside to cool.
To make the Blondies:
3. Preheat oven to 350 degrees and butter the bottom of a 10 x 15 glass pan. (I used Crisco)
4. Whisk together flour, salt and baking powder in medium bowl. Set aside.
Batter mixture
5. Cream butter and sugars until well-combined. Add the vanilla, then the eggs, one at a time, beating well after each one. 
6. Fold in the flour mixture, and then add the macadamia nuts and white chocolate chips.


7. Spread half of the batter into the bottom of the baking dish. Cover with the cooled raspberry puree, and then top with the remaining batter. Swirl around the rest of the batter until it looks like the picture. (Kinda messy!)
8. Bake for 35-38 minutes or until a toothpick inserted in the center comes out clean. Cool on a rack before cutting about 1-2 hours. I sliced mine into 36 bars.
Swirl the rest of the batter on top
ENJOY!

Thursday, September 6, 2012

Chocolate Zucchini Muffins


Hi everyone! Happy Thursday! Hopefully you have all enjoyed a shorter week with the Labor Day holiday- only one more day to go! I made these chocolate zucchini muffins this past weekend and have gotten a few requests for the recipe so I thought I would go ahead and share it with y'all! I don’t know about you but this time of year is usually filled with lots of ‘end of season’ zucchini that many of my friends and relatives are trying to give away or use up. Zucchini bread is typically an all-around favorite but since I’ve made it twice this summer already I thought I’d go for something different. There are recipes for zucchini cookies that look yummy and I might give those a try soon; however these chocolate zucchini muffins (or cupcakes if you decide to frost them!) were quite a hit! I didn’t plan to blog this so I don’t have as many pictures as normal but it’s pretty simple to throw together!

CHOCOLATE ZUCCHINI MUFFINS

What youneed for the muffins:
2 large eggs
1/3 cup honey
1/2 cup vegetable oil
1/2 cup brown sugar
1 tsp. vanilla extract
1 tsp. salt
1/2 tsp. baking soda
1/2 tsp. baking powder
1/3 cup unsweetened cocoa powder
1 and 2/3 cups all-purpose flour
2 cups shredded, unpeeled zucchini, gently pressed with papertowel
1 cup semi-sweet chocolate chips

To makethe muffins:
1.Preheat oven to 350 degrees. Lightly grease a muffin pan, or line the pan with cupcake liners. I used Crisco and they popped right out of the tins after cooling for about 5 minutes.
2.In a large mixing bowl, beat the eggs, honey, oil, brown sugar, and vanilla until smooth. Add the salt, baking soda, baking powder, cocoa powder, and flour, mixing until well combined. Stir in the shredded zucchini (be sure you’ve pressed it gently with a couple of paper towels to dry it out a bit) and chocolate chips.
3.Pour the batter into the muffin pan, filling the cups 3/4 of the way full. 
4. Bake regular-sized muffins for 18 to 22 minutes, or until a toothpick inserted into the center of a muffin comes out clean. (If you’re making mini muffins, bake them for about 10 to 12 minutes.) Let cool for 3 or 4 minutes in the muffin pan before removing to a rack to cool completely.


For me, this recipe made 18 regular sized muffins. If making you want to turn this into a loaf, the recipe suggested one 8.5” by 4.5” loaf and baking for 30-40 minutes.

If you really want these as a sweet treat I'd suggest icing them with the Fluffcream Frosting recipe found here.

ENJOY!!

Monday, September 3, 2012

Crunchy Croutons

This recipe is super simple and totally worth the extra effort. Everyone will notice how amazing these croutons are compared to store bought and it's a really nice touch for your guests. Since salads are usually pretty easy to throw together this is a great homemade addition to augment your greens!

GARLIC CHEESE CROUTONS

What you need for the croutons:
1/2 a loaf of Italian bread (can be a couple days old) cut into cubes
5-7 tablespoons of melted butter
2 large cloves of garlic
1/2-1 cup shredded parmesan cheese

To make the croutons:
1. Cut your bread into cubes and place on a cookie sheet.
2. Crush two garlic cloves into a bowl, add the butter and then melt.
3. Brush the melted garlic butter on the bread cubes; be sure to cover all sides of each cube. This means you may have to move the cubes around to be sure they're coated.
4. Now sprinkle Parmesan cheese all over the bread cubes. Try to get it on top of the pieces of bread. It's okay if it gets on the cookie sheet, too, as the butter that's spread on the pan will keep the cheese stuck together. You'll get croutons with pieces of crispy cheese stuck to them- these are the best ones!!


5. Bake in a 350 degree oven for about 6-7 minutes. Then, if your oven allows, turn on High Broil for the last 2-3 minutes until the croutons looks golden. Be sure to keep a close eye on these while in the oven- you don't want to walk away for too long because they can go from done to burnt in a matter of a minute!


ENJOY!

Nutella Brownies- with a CRUNCH

Hi Everyone!! Been a bit busy the last couple of weeks so it's make up time. This weekend was Labor Day which is always a nice three-day weekend break before the start of fall. I may not have been at work today but I certainly did accomplish a lot at home! This weekend was the start of Purdue Football- a great time of fun and food in this household. We hosted the first tailgate of the year on Slayter Hill in West Lafayette, IN and celebrated a big W against Eastern Kentucky. My parents came for a visit and we made pulled bbq pork and chicken sandwiches, cheesy potatoes and coleslaw for the group on Saturday. The rest of the tailgaters brought yummy side dishes, too. 

On Sunday, Danny and I adopted a kitten!! We pick him up later this week (has to be fixed first!) but we have been hard at work on his new 'home' shown below:
This has certainly been a laborious process! It's still a work in progress but we're really excited that it's coming close to finished! Finally, what would a weekend be in the Hlavek household without some baking? I got busy in the kitchen today and want to share some recipes with you.  This first one is super easy and super tasty! Who doesn't like the sweet and salty combo mixed with a crunch?! Since Nutella is all the rave right now I was anxious to give it a go in my newest baking creation!

NUTELLA BROWNIES- with a CRUNCH!

What you need for the Crunch:
1 1/2 cups pretzels
1/3 cup brown sugar
3 tablespoons unsalted butter, melted


What you need for the Brownies:
1 cup Nutella
2 eggs
10 Tb all purpose flour (or 1/2 cup plus 2 Tb)
1/4 tsp salt
1/4 cup chocolate chips (optional- I didn't use these)

To make the Crunch:
1. Spray an 8x8 square pan with cooking spray or grease with Crisco
2. Place the pretzels in a large ziploc bag and crush with a mallet until broken up into tiny pieces. Add the sugar and mix until combined, then pour in the butter. Continue mixing until all pieces are coated with butter.
3. Press the pretzel mixture firmly into the prepared pan. Bake for 12 to 15 minutes, until the edges are golden and the crust feels firm. While the crust is baking get to work on your brownies.


To make the brownies:
4. Mix together eggs and Nutella in a medium bowl until smooth. (If Nutella is too firm, pop it in the microwave for 20-30 seconds and let it soften. This will help you mix in the eggs easier.)
5. Add in flour and mix until just combined.


Put it all together:
6. Once your pretzel crust is ready, spread your brownie mixture evenly over the top. (Sprinkle each with a few chocolate chips, if desired.)
Bake about 13-16 minutes until a toothpick comes out clean from the brownie topping.
Right before I popped it in the oven!

ENJOY!!