Sunday, August 19, 2012

Not your average corn muffin

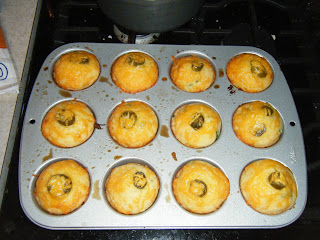
Hello everyone! Sorry for the delay in posting- I was back in Canada this past week. Such a refreshing change in weather- I could be baking without guilt there every day. It was only 40-something in the morning when we got up- my blood was sure not used to that! Anyway, I returned Thursday and Danny and I planned our weekend meals. Although it has not been as cool as Canada, there was still a nice drop in temperatures in West Lafayette that had me thinking fall. I was craving a big pot of chili and corn muffins! I had seen a Pinterest post a while back for jalapeno cheddar corn muffins that looked amazing and I had to give them a try! As always, I’ve adapted the recipe to fit our likes so feel free to do the same. I hope you enjoy the spicy treat as much as we did!

JALAPENO CHEDDAR CORN MUFFINS

What you need for the muffins:
1 cup all-purpose flour
1 cup cornmeal
1 tablespoon baking powder
1/2 teaspoon salt
1/2 teaspoon black pepper
6 tablespoons unsalted butter, melted
1 cup buttermilk
2 tablespoons honey
2 large eggs
1 jalapeno, seeded and diced (be careful not to touch your eyes when you do this! I also kept a few of the seeds for a little extra oomph!)
12 jalapeno slices (I used these from a jar since I only bought one jalapeno but you could use fresh)
1/2 cup fresh shredded Parmesan
1/2 cup shredded cheddar, plus more for topping

To make the muffins:
1. Preheat the oven to 400 degrees F.
2. Spray a 12-cup standard muffin tin with Pam or grease (you could also line the muffin tin with paper liners) set aside.
3. In a large bowl, combine the flour, cornmeal, baking powder, salt and pepper.
4. In a large glass measuring cup or another bowl, whisk together the butter, buttermilk, honey and eggs.
5. Pour your wet mixture over the dry ingredients and mix until just combined.

6. Add the two cheeses and diced jalapenos and mix until evenly incorporated.

7. Place batter into your muffin tins about 3/4 full.
8. Top with a jalapeno slice and then sprinkle with cheddar cheese.

9. Bake for 12-15 minutes until a toothpick comes out clean.


ENJOY!

Wednesday, August 8, 2012

Cake Craze!

The Hlavek household has been a busy bakery tonight! Just call us snack and sugar junkies this week! Between leftover spinach artichoke dip and turkey meatballs (in addition to dinner!) on Monday and a movie night yesterday with way too much popcorn, we’re on chow overload here! Might as well wash all of that early week snacking down with a sugar splurge, right? At least I do have somewhat of an excuse: We’re heading over to our pastor’s house for a visit tomorrow and I offered to bring dessert. See, some of this won’t be eaten tonight! ;) But since we have been in mindless munching mode, I thought I’d throw in one more sweet treat for fun (and I promise we’ll share the leftovers tomorrow at work)!

One of Danny’s favorites is pineapple upside down cake. Surprisingly, I have never made this. (I know, I’m a bad wife!) However, most of the time Danny is not much of a dessert person and making an entire pineapple upside down cake for just the two of us would be outrageous. (Although, at the rate we’re going this week I probably shouldn’t talk!) Anyway, it has been on my list to do for quite a while and I’d seen a cute twist on the classic from Pinterest so it’s time to give it a whirl! The recipe makes 6 jumbo cupcakes or 8 regular. Danny was upset to learn that the regular size pan would not allow the entire pineapple ring to fit in the bottom; I wanted an excuse to buy a new pan so jumbo size it is!

To quench our crunchy munchy mood, I came across a Cake Batter Buddies recipe that I just couldn’t pass up. Since I had all the ingredients on hand for both recipes I took that as a sign to just get busy in the kitchen! We’ll start with the cakes since they’ll be the most time consuming- although still fairly easy. While they’re baking we can get busy with the CBBs!

PINEAPPLE UPSIDE DOWN (JUMBO) CUPCAKES

What you need for the cake:
2 eggs
2/3 cup white sugar
5 Tbsp pineapple juice
2/3 cup all-purpose flour
1 tsp baking powder
1/4 tsp salt
Jumbo or regular muffin tin (makes 6 jumbo or 8 regular-I’m doing the jumbo size)

What you need for the topping:
1/4 cup butter (1/2 stick)
2/3 cup brown sugar (I used 1/3 cup light, 1/3 cup dark)
1-can pineapple rings
6-8 maraschino cherries

To make the cake:
1. Preheat the oven to 350 degrees.  Spray your muffin tins with non-stick cooking spray. 
2. In a mixing bowl add eggs, white sugar, and pineapple juice.  Beat for 2 minutes. 
3. In a separate bowl sift together the flour, baking powder, and salt. 
4. Add the dry mixture to the wet ingredients and turn mixer back on for about 2 minutes. 

To make the topping:

1. In a small sauce pan melt the butter and add the brown sugar.  Stir on low heat for one minute.

Put it all together:
1. Spoon a layer of the warm brown sugar mixture into the bottom of each muffin tin, then place a pineapple ring on top.   

(If you’re using regular muffin tins, a full size ring won’t fit; you can just cut them down into chunks or use pineapple tidbits.) Add a cherry in the middle of each pineapple.
2. Pour cake mixture over the top of your pineapple mixture to fill muffin tin 3/4 of the way. (I put the batter in my 2-cup Pyrex measuring cup and poured it out.)  

3. Bake jumbo cakes for 25 minutes (regular cakes will take about 20 minutes).
4. When a toothpick comes out of the middle of the cake clean, they are done! 5. Remove from the oven. 
6. Let cool in pan for 3 minutes.
 
7. Run a knife or spatula around the edge of each cake to help loosen in case it sticks a little. 
8. Place a wire cooling rack on top of the cakes, and quickly flip over on top of sheet tray to catch extra drippings. 
This was after we flipped them on top of the sheet.


I know they look messy but I'm betting they are yummy!


ENJOY!!

CAKE BATTER CRUNCH BUDDIES 

What you need for Funfetti Cake Batter Buddies:
7 cups Chex cereal (I used Corn Chex, but any variety will work!)
10 oz (5 squares) vanilla flavored Almond Bark (do not substitute white chocolate chips- they just do not melt as well)
1 1/2 cups Funfetti cake mix
1/2 cup powdered sugar
1 tsp vegetable shortening
3/4 cup mini marshmallows (optional)

To make your buddies:
1. Measure out your cereal in a large (and I mean BIG) mixing bowl.
2. Melt the almond bark according to the package directions. I added the vegetable shortening about half way through the melting to help thin it out.
3. Drizzle the melted almond bark over the cereal. Mix gently with a large spoon or spatula (I coated my spatula in Crisco so it would mix easier and not break all the cereal.)
Tossed with the almond bark

4. Now you can transfer your chocolate coated cereal into a large Ziploc bag, or just continue to use your bowl and spoon/spatula but you need to toss the funfetti mix and powdered sugar onto the cereal. I chose the bag route as I like to shake it up and I think it mixes better this way. Just be sure your cereal gets evenly coated.
5. As a final option, I thought tossing in some mini marshmallows would be fun. The recipe didn't call for them but they went with the white, bite-size theme and I thought it seemed like a cute idea!


ENJOY!!

Sunday, August 5, 2012

Hail Caesar!! Chicken Caesar Pizza

CHICKEN CAESAR PIZZA
Alright everyone, time to break the dessert baking trend! I’m blogging about my first savory recipe today! And oh my gosh, this was hands down the best thing we have ever made! When Danny and I were in Florida on vacation, we went to a place called Mellow Mushroom. It was the most amazing pizza…completely different flavors and ideas than you would ever think about for pizza. Our favorite was the chicken Caesar. It was awesome! Cheesy, buttery, garlicky pizza with a Caesar salad on top. We actually went there two nights in a row it was so good! When one of our sets of plans was canceled we decided it couldn’t get much better than MM and that is when we discovered this gem. We’ve been in withdrawal since coming home because there isn’t one around us so of course, we went on our quest for a copycat recipe. I am so excited and ecstatic to tell you that on our first try- we nailed it! That never happens…the first time is always rough and full of ‘next time, we’ll do this instead’. Not yesterday!! I hope that one of you will enjoy this as much as Danny and I did :) I will separate the crust recipe from the toppings so you can top it however you wish. The crust was out of this world and I must give props to www.food.com for the ‘easiest best focaccia bread recipe’ as this was hardly tweaked at all! If Caesar salad and pesto isn’t your cup of tea I would still recommend trying this crust recipe and topping it with whatever you please. If you’re up for a completely new twist on pizza though, then give this a shot! (Side note: this is NOT a healthy recipe, you can modify if you wish but I won’t promise the same amazing results. The reason this is so good is because it’s super buttery…just don’t eat lunch ;)

What you’ll need for the crust:
2 3/4 cups all-purpose flour
1 teaspoon salt
1 teaspoon white sugar
1 (1/4 ounce) packet active dry yeast
1 teaspoon garlic powder
1 teaspoon oregano
1/2 teaspoon dried thyme
1/2 teaspoon dried basil
1 dash ground black pepper
1 tablespoon vegetable oil
1 cup warm water (105-115 degrees)
2 tablespoons olive oil
2 tablespoons parmesan cheese (I used the Kraft crumbly kind for this because I think it bakes better on the dough)
2 tablespoons butter (for the pan)
Crisco (for the pan)

To make the crust:
1. Mix the yeast and water in a small bowl. Let proof for 10 minutes (until bubbles begin to form).
2. In large bowl, stir together flour, salt, sugar, garlic powder, oregano, thyme, basil, and black pepper.
3. Add the yeast mix and vegetable oil to the dry ingredients and combine.
4. When dough has pulled together, turn out onto lightly floured surface and knead until smooth and elastic.
5. Lightly oil a large bowl, place dough in bowl; cover with damp cloth and let rise in warm place 25 minutes.
6. Preheat oven to 425 degrees.
7. Prepare the baking sheet or pizza pan (we use a deep dish pizza pan) by greasing with Crisco; then melt 2 tablespoons of butter in the bottom (like I said, this isn’t healthy).
8. Punch dough down, form into whatever shape you please about 1/2 inch thick (we did a circle for pizza pan); place on buttered and greased baking sheet.
9. Brush top with olive oil, then sprinkle with Parmesan cheese.
10. Bake for about 8 minutes until starting to bubble; then take it out so you can put on your toppings. (Caesar topping recipe below.) Put back in oven and bake for another 6-10 minutes until golden brown and cheese is bubbling.

What you’ll need for the chicken Caesar toppings:
1 chicken breast
1 tablespoon of olive oil (for chicken)
~1/2 cup Basil Pesto (I used the Classico brand)- I’m not sure exactly how much we used but you’ll need some for cooking the chicken and some for the pizza crust
2-3 cups shredded Mozzarella cheese (we used fresh- it melts so much better)
1 cup shredded Fontina cheese
1/2 cup crumbled feta cheese
1/4 cup olive oil
2 large cloves of garlic
1 head romaine lettuce
Caesar dressing
1/4 cup shredded Parmesan cheese

To make the chicken Caesar pizza:
1. Get a sauté pan very hot to cook the chicken. Use about a tablespoon of olive oil in the bottom and start the chicken breast. Flip once about 3 minutes in; cook another 1-2 minutes. Take chicken out of pan (it won’t be cooked all the way through) and slice into thin pieces.
2. Put the chicken slices back in the pan and top with about a 1/4 cup of pesto. 
3. Turn heat up in pan (to get a nice sear) and cook until the chicken is done (about 4-6 minutes more). Make sure the chicken has a nice golden color to it. Turn chicken off and leave in pan until you’re ready to top your crust.
Our golden pesto chicken
4. Crush the two cloves of garlic and mix with the olive oil; sauté in a pan or heat in the microwave to cook the garlic for a bit (not long; 2-3 min sauté or 30 seconds in microwave).
5. After the dough is close to done baking (about the 8-10 minute mark) take it out the oven and use the garlic oil as the sauce. Spread it around evenly across the top of the crust.
6. Coat with some pesto (we probably used another 1/4 cup but it's up to your preference) as additional sauce. 
Here is the crust with the sauce; you can tell that it's not quite done yet because the edges are not golden


LOTS of cheese!!


7. Place slices of chicken on top of the sauced crust.
8. Top with the shredded cheese. 
9. Put back in oven and finish baking. (We did about 5 minutes at 425; then broiled on high for a final 5 minutes until the cheese was golden and bubbling.)


Right after it's come out of the oven


10. While your pizza is finishing 
it’s bake, cut the head of romaine and toss with the Caesar dressing and shredded parmesan cheese.


Danny's making a guest appearance in my blog!

11. When your pizza is all done baking, take it out and let it rest for a few minutes (we also soaked up a little extra oil/grease with paper towels from the top). Then slice into triangles and top with the Caesar salad. You’ve now made the most magnificent pizza! Crack open a beer or pour a glass of wine and
Topped off with the salad: A-MAZ-ING!!

ENJOY!!

Friday, August 3, 2012

Cups of Cookies?


CHOCOLATE CARAMEL COOKIE CUPS

Hello and Happy Friday to everyone! I hope you’ve all had a good week. I’ve been feeling a little under the weather myself but I’m grateful to have been home for the last week. Because of that, I’ve had some time to do more recipe research and find another yummy treat to share with you. I've been on a cookie cup quest lately and tracked down 3 recipes that I want to try. This is the first of the 3 so you can expect a few more cups of cookie treats to come your way in the near future! :)

To be honest, when I made these last night I was not quite as pumped up as normal because my energy level has been down; however, these little bites are so yummy that it was well worth the effort! I learned quite a bit throughout the process so hopefully my tips will make your first batch more successful than mine! Although, even if they do fall apart they are still scrumptious and you can keep those for yourself! ;)

What you need for the cookie cups:
Mini-muffin tins (pictures below)
1 cup butter (2 sticks) room temp
1 cup dark brown sugar (this makes a difference in flavor so try not to substitute light)
1/2 cup granulated sugar
2 eggs
2 tsp vanilla
2 1/2 cups all-purpose flour
1 tsp kosher salt
1 tsp baking soda
40-50 unwrapped Rolo candies
40-50 waffle-style Pretzels (I used Snyders of Hanover)
*As a note- this recipe made over 50 cookie cups for me so you may need extra Rolos. I ran out so I put a dollop of peanut butter on the top of the ones that did not have a Rolo. Still super yummy!
*Extra note- you could use refrigerated cookie dough if you're short on time and don't want to make this from scratch. Sugar dough would be plain but I bet peanut butter would add a fun twist!

To make the cookie cups:
1. Preheat oven to 350
2. Spray a mini muffin pan with non-stick spray or grease with Crisco (I tried both ways because I was having trouble getting the cups out- I didn’t notice a difference between the two. Just be sure to use a lot!)
3. With mixer on medium, cream the butter and sugars together, mixing until incorporated evenly.
4. Add eggs and vanilla, beating until combined, about 30 seconds.
5. Turn mixer speed to low. Add in your baking soda and salt. Mix in your flour one half cup at a time until just combined. It’s a pretty sticky batter.
6. Form balls of the dough to place in the bottom of your prepared muffin tins. (The first couple of batches I made, the balls were too big and the cookie expanded over the cup into a muffin shape. You want to avoid this because they’re really difficult to get out if it happens. The balls were a bit bigger than a marble…just be sure to give them plenty of room to grow.)
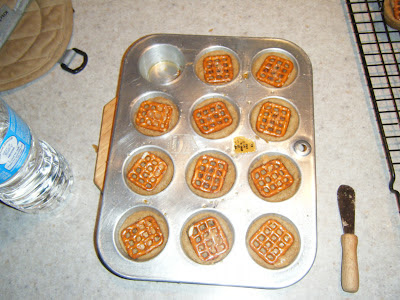
7. Gently press a Rolo into the center of each batter-filled cup. (You do not want the dough to be more than 2/3 as high as the well of the muffin tin. If the dough comes up too high around the Rolo you need to take some dough out.)
8. Bake for 10-12 minutes or until the edges are golden brown; mine took 10 minutes a batch.
9. As soon as they come out of the oven press a pretzel directly on top of the cookie cup into the melted chocolate of the Rolo. I used a fork to do this; some of the caramel will ooze out but that makes them yummier!
10. Let sit on a wire rack in pans for about 10-15 minutes to cool and then try to remove from pans. If they are the height of the tin (and did not muffin-top over) they will be pretty easy to get out with a small knife or spoon. Just gently loosen the edges of the cookie from the pan and it should pop out. If you do end up with a bit of a muffin edge, they will be a little messy but like I said, they still taste great!


Here are some pictures of the process:


This is my first batch- there is too much dough in these and they overflowed into muffins! 


This was the second batch- better but still a bit much on the dough.


Third time is a charm! These turned out just the right size. Take note that after the Rolo has been pushed in there is still a lot of room left in the cup!


Yum!! This is what they look like before trying to take them out. Notice there is no 'muffin top'. The little knife to the right is what I used to loosen them from the sides of the pan.

ENJOY!