CHOCOLATE CARAMEL COOKIE CUPS
Hello and Happy Friday to everyone! I hope you’ve all had a good week. I’ve
been feeling a little under the weather myself but I’m grateful to have been
home for the last week. Because of that, I’ve had some time to do more recipe
research and find another yummy treat to share with you. I've been on a cookie cup quest lately and tracked down 3 recipes that I want to try. This is the first of the 3 so you can expect a few more cups of cookie treats to come your way in the near future! :)
To be honest, when I
made these last night I was not quite as pumped up as normal because my energy
level has been down; however, these little bites are so yummy that it was well
worth the effort! I learned quite a bit throughout the process so hopefully my tips
will make your first batch more successful than mine! Although, even if they do
fall apart they are still scrumptious and you can keep those for yourself! ;)
What you need for the cookie cups:
Mini-muffin tins (pictures below)
1 cup butter (2 sticks) room temp
1 cup dark brown sugar (this makes a difference in flavor so try not to
substitute light)
1/2 cup granulated sugar
2 eggs
2 tsp vanilla
2 1/2 cups all-purpose flour
1 tsp kosher salt
1 tsp baking soda
40-50 unwrapped Rolo candies
40-50 waffle-style Pretzels (I used Snyders of Hanover)
*As a note- this recipe made over 50 cookie cups for me so you may need extra Rolos. I ran out so I put a dollop of peanut butter on the top of the ones that did not have a Rolo. Still super yummy!
*Extra note- you could use refrigerated cookie dough if you're short on time and don't want to make this from scratch. Sugar dough would be plain but I bet peanut butter would add a fun twist!
To make the cookie cups:
1. Preheat oven to 350
2. Spray a mini muffin pan with non-stick spray or grease with Crisco (I tried
both ways because I was having trouble getting the cups out- I didn’t notice a
difference between the two. Just be sure to use a lot!)
3. With mixer on medium, cream the butter and sugars together, mixing until
incorporated evenly.
4. Add eggs and vanilla, beating until combined, about 30 seconds.
5. Turn mixer speed to low. Add in your baking soda and salt. Mix in your
flour one half cup at a time until just combined. It’s a pretty sticky batter.
6. Form balls of the dough to place in the bottom of your prepared muffin
tins. (The first couple of batches I made, the balls were too big and the
cookie expanded over the cup into a muffin shape. You want to avoid this
because they’re really difficult to get out if it happens. The balls were a bit
bigger than a marble…just be sure to give them plenty of room to grow.)
7. Gently press a Rolo into the center of each batter-filled cup. (You do
not want the dough to be more than 2/3 as high as the well of the muffin tin.
If the dough comes up too high around the Rolo you need to take some dough out.)
8. Bake for 10-12 minutes or until the edges are golden brown; mine took
10 minutes a batch.
9. As soon as they come out of the oven press a pretzel directly on top of
the cookie cup into the melted chocolate of the Rolo. I used a fork to do this;
some of the caramel will ooze out but that makes them yummier!
10. Let sit on a wire rack in pans for about 10-15 minutes to cool and then
try to remove from pans. If they are the height of the tin (and did not
muffin-top over) they will be pretty easy to get out with a small knife or
spoon. Just gently loosen the edges of the cookie from the pan and it should
pop out. If you do end up with a bit of a muffin edge, they will be a little messy
but like I said, they still taste great!
Here are some pictures of the process:

Third time is a charm! These turned out just the right size. Take note that after the Rolo has been pushed in there is still a lot of room left in the cup!
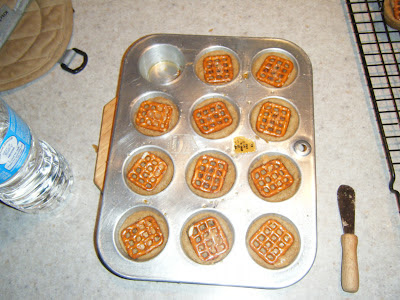
Yum!! This is what they look like before trying to take them out. Notice there is no 'muffin top'. The little knife to the right is what I used to loosen them from the sides of the pan.

 |
This is my first batch- there is too much dough in these and they overflowed into muffins!
 |
This was the second batch- better but still a bit much on the dough.

Third time is a charm! These turned out just the right size. Take note that after the Rolo has been pushed in there is still a lot of room left in the cup!

Yum!! This is what they look like before trying to take them out. Notice there is no 'muffin top'. The little knife to the right is what I used to loosen them from the sides of the pan.

ENJOY!
No comments:
Post a Comment